Showing posts with label zinc. Show all posts

Thursday, 5 January 2012

You can’t keep an old etcher down

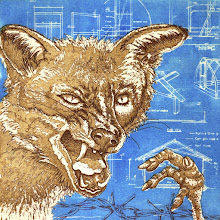
After a hiatus of about six months, it’s good to be etching again. I started this image as a wood engraving but the call of the aquatint was too strong, so here he is on a 20 x 30 cm zinc plate. I’m trying to work more quickly and haphazardly, not so meticulously with this one so we’ll see how that approach goes; I’m pleased with how he’s coming along so far though. Working on some text to go with the image now.

Whilst I was at it, I mixed up a new batch of copper sulphate solution – quite a pleasing New Year ritual. The vibrant blue of the copper sulphate crystals and the way they turn green and yellow when mixed with salt and hot water, then back to a blue solution made me think of Spring. Not that I’m wishing my life away, but the days are getting longer now…

Monday, 27 December 2010

Temporary winter quarters

It was -2°C in the studio yesterday; the water in my plate-rinsing bowl had frozen over. That’s the coldest it’s been in there so far this winter (when I’ve wanted to work anyway) and even with the heater on, it’s not warm enough to ink up. So, I have decamped to the kitchen and utility room for the time being, with swift sorties to the studio to print.

I finished a plate yesterday which is satisfying; it’s taken me just over two months which is quite fast for me so I’m pleased with that too. My big problem is that I work so slowly, partly because I just don’t get much time to spend on my artwork these days. Or write blog posts; when was the last one…?

I’m glad this particular plate is finished because having worked on aluminium for the last few months, I can now go back to zinc which I prefer. This particular plate has come out peculiarly speckly in comparison with other aluminium plates I’ve worked on (see image with blog post dated 13 October 2010) and I have absolutely no idea why. Does aluminium have a ‘grain’? With zinc, I find I can get much cleaner lines and more variety of tone and texture. Shame it’s so much more expensive and not so easy to source and cut. Aluminium is great in that respect.

Well, that’ll be the last plate of the year; a very good time to finish it. Time now to reflect on what I’ve achieved over the last year and what’s coming up in the next. Some exciting firsts on the horizon for me - looking forward to it.

Thursday, 25 March 2010

Aluminium versus zinc

On Tuesday, I paid a visit to Metal Supermarkets here in Southampton in search of zinc plate. It was my first visit as I usually get my plates from printmaking suppliers but I was after some tricky sizes. Sarah and Katherine, who run Red Hot Press, mostly use aluminium for etching and source it there so I thought I’d give it a go. No solid zinc sadly, just Zintec sheet which is mild steel electro-coated with zinc apparently. Not sure how thick the coating is but I would imagine it doesn’t bear too much reworking before you’re down to the steel. I bought some aluminium instead - never tried it before but Sarah gets good results with it - and it was much cheaper than equivalent sized plates from printmaking suppliers. Bonus.

Was lucky enough to squeeze a couple of studio hours in this afternoon, between the chores, family stuff and general domestic flim-flam, so prepared a couple of small test plates for line work and aquatinting. I’m still getting a grip on how aquatinting works on zinc so this probably isn’t the best time to be experimenting with a new material, but there we are. And the aluminium does indeed feel and look very different to zinc when etched. It seems to take a lot longer to bite in the copper sulphate solution and the marks left around the particles of resin look very different too. Even the inking and wiping feels different and the weight and density of the plate in the hand. Odd how familiar one can get with (and attached to I suppose) the feel of a piece of metal.

The photos show the difference between pine resin aquatint on aluminium (top) and zinc (bottom).

Saturday, 7 March 2009

What a good day I had yesterday.
After five long months intaglioless, I finally got a chance to get thoroughly inky again. There’s nothing so satisfying as being able to look at one’s blackened fingernails and ink-stained skin, knowing that there’s a batch of freshly pulled prints – good ones at that – flattened under boards to dry.


I really didn’t expect to pull so many good ones yesterday. Five months is a long time to be away from one’s work. Prior to that, I was printing and etching every other week and working on the plates in between. Working that intensively, you become familiar with all the little nuances of the plates; you know exactly how much ink to use, which areas need a little more or a little less; how to wipe, where to wipe vigorously, where to wipe gently. As you pull each proof, you study it and notice all its subtleties, making decisions almost subconsciously as you go along. It sounds poncey I know, and I like to think I’m not pretentious but I think it’s true to say that you work with the plate rather than on it. That’s what’s so wonderful about etching – you’re never quite sure what you’re going to get. You have an idea how it’ll look when you pull that first proof, but there’s always an element of surprise. The plate, the ground and the etching solution all conspire to give you something you didn’t quite expect. It may not always be a good surprise of course, but that keeps you from complacency.

Yesterday I printed the second and third images in my Red Scar series. I’ve used details of these in the blog header and as my profile picture. They’re soft and hard ground on zinc, with some rather haphazard use of straw hat varnish, etched in copper sulphate solution. The plate area is approximately 15 x 10 cm. Like most of my work, they are illustrative – based on a story about a highwayman. A story destined never to be finished…

Tuesday, 3 March 2009

What’s the purpose of this blog?
Partly for me to record my progress learning a new technique and partly as a place for me to reflect on my art practice. I would say that 80% of the creative process for me goes on in my head. I tend to mull over ideas for weeks before actually putting anything on paper, card, zinc or wood; presumably this can be said for most artists to some extent. I do make a few notes in my sketchbook but they’re minimal.


The first thing I discovered about wood engraving was that it’s by no means as easy as it looks! Much more difficult than linocutting, not just because the matrix is harder, but because one is working on a much smaller scale. I very much admire the work of engravers such as Hilary Paynter and Jim Westergard and I suppose in my ignorance, I was aiming for that kind of neatness and detail straight away. Think again Jo. Obviously, to produce that kind of work takes years of practice and an innate talent that no amount of hard work can produce. So, here on this blog, you can see my humble, clumsy but well-intentioned beginnings.

I started off with a box of practice blocks; hence the odd shapes of some of my initial prints. I quite like that actually – gives another dimension to the work. Certainly I think it worked with Comedy and Tragedy (below in previous post).

Wood engraving (as any method of relief printmaking) produces very different results to etching. I’ve had to reorder my way of thinking about an image; instead of working from light to dark as one does with etching, drawing the darks onto the plate, I now have to work from dark to light, cutting out the lights from the dark of the block – if that makes sense. Also, the whole process of creating tone and texture is very different. The possibilities are endless with etching – with wood engraving, there seem to be many more constraints. And yet, look at Hilary Paynter’s Goblin Market or Jim Westergard’s The Artist as a Viking and you see that it can be done. First task then is to experiment with different mark-making techniques.